
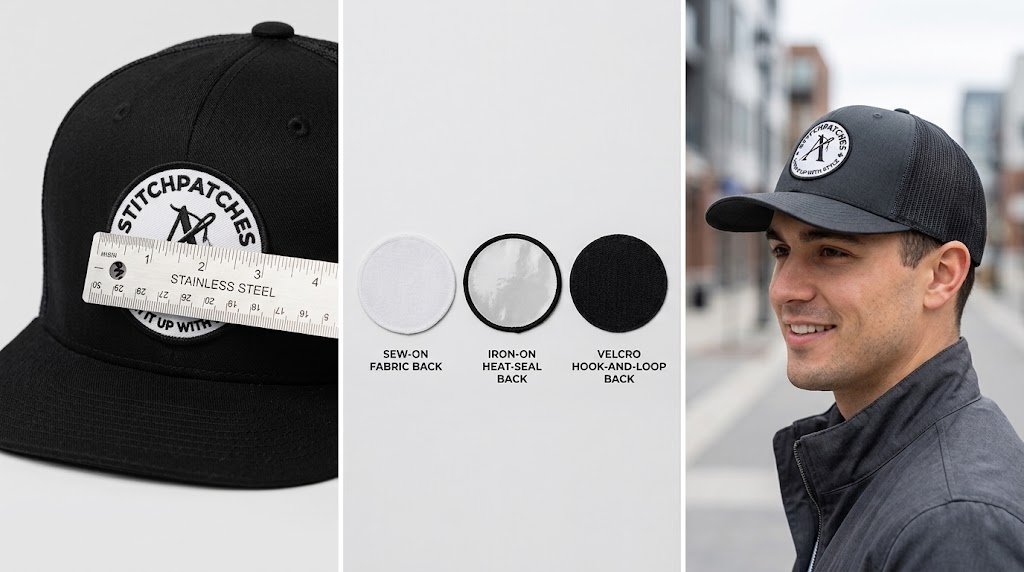
Quick Answer. The right patch for a cap depends on four things working together. Choose a size that fits the front panel of the cap. Most caps suit a patch between 6 and 9 cm wide or about 2.5 to 3.5 inches. Choose a shape that follows your design. Choose a backing that matches how the cap will be worn washed or heat pressed. Then centre the placement on the flattest part of the front panel. Get the size and backing right first and the rest of the decision becomes simple.
Choosing a patch for a cap looks simple until the artwork comes back too small to read or the backing fails after one wash. A snapback a trucker cap a dad hat and a toque each hold a patch differently. This guide walks through size shape backing and placement in the order they actually need deciding so you can order with confidence the first time.
What Is A Patch For A Cap
A patch is a separate piece of fabric with a design stitched or applied onto it. It is then attached to the cap using stitching heat or a hook and loop system. This is different from direct embroidery where the design is stitched straight onto the cap fabric with no separate patch involved.
A patch gives a raised textured finish. It also lets you apply the same design to many caps with a consistent result. Direct embroidery sits flatter on the cap and often suits very fine text better since it is not limited by a patch edge or a backing layer.
The front panel of the cap sets the usable space. The patch size and shape need to fit that space. The level of detail in the design needs to suit the patch size. The thread or fabric colour needs enough contrast against the cap to read clearly from a normal viewing distance.

What Size Patch Is Best For A Cap
Most cap patches work well between 6 and 9 cm wide or about 2.5 to 3.5 inches. This range fits the flat area on a typical structured cap front panel before the fabric starts curving sharply toward the sides.
Two factors move you within that range.
- Panel height. A snapback or a structured dad hat often has a taller upright front panel than a curved trucker cap so it can carry a slightly larger patch.
- Detail level. Text needs more room than a simple mark. If your design includes any readable text keep the patch no smaller than about 6 cm wide. Below that letters tend to blur together once applied.
Example. A simple monogram or single icon reads well at 6 to 7 cm wide. A club crest with a motto line beneath it usually needs closer to 8 or 9 cm to keep the text legible.
What Shape And Detail Level Works Best
A patch shape should follow the natural outline of your design rather than the design being squeezed into a shape chosen first. A round logo suits a round or oval patch. A wordmark suits a rectangle. A crest suits a die cut shape that follows its outline.
Curved caps favour softer rounded edges. A rectangle with sharp corners is more likely to lift slightly at the corners on a curved panel than a rounded rectangle or oval of the same size since there is less fabric fighting the curve at each corner.
Detail level also matters.
- Simple designs with one to three colours and bold shapes hold up well even at smaller sizes.
- Moderate designs such as a crest with a small amount of text need the middle of the size range and benefit from denser stitching in the detailed areas.
- Highly detailed designs with fine linework small multi line text or photo style shading rarely translate well to embroidery at cap patch sizes. A woven patch which uses finer thread often reads more clearly for this kind of detail.
Patch shapes and design gallery
What Backing Should You Choose For A Cap
Backing choice depends on how permanent you want the patch to be and how the cap gets cleaned or worn through a Canadian winter.
| Backing Type | Best For | Durability On A Cap | Removable |
|---|---|---|---|
| Sew on | Permanent branding team or club caps everyday wear | Highest since it is stitched directly into the fabric | No |
| Iron on | Light or occasional use caps | Moderate. Can lift with heavy washing or on textured fabric | No without damage |
| Hook and loop | Caps that need a swappable patch or seasonal design | Good when the loop panel is properly sewn on | Yes |
| Adhesive | Single event or short term use only | Low. Not built to survive washing | Yes but not reusable |
Sew on backing generally performs best on a cap since it resists lifting at curved edges better than a heat bonded option. Industry backing guidance notes that sew on backing is typically the most durable choice while iron on suits quick light duty use and hook and loop suits patches that need to be swapped.
Canadian winters add another factor. A cap left out in freezing then thawing conditions puts extra strain on adhesive and iron on backings. Sew on stitching holds up better through repeated cold to warm cycles and heavy wash loads across a Canadian winter season.
Where Should A Patch Sit On A Cap
The standard placement is centred on the front panel roughly midway between the peak seam and the top of the crown. This is the flattest and most visible spot on most cap styles.
A secondary placement on the side panel works for a smaller supporting mark. A placement on the back panel above an adjustable strap works only for a very small secondary logo since it is the least visible spot on the cap.
Keep the patch inside the panel seams on every placement. A patch that overlaps a seam will not sit flat no matter how well it is sized.
Does Cap Style And Canadian Weather Change Your Choice
Yes and this factor gets skipped in most general patch guides. A structured cap such as a snapback holds a patch flatter and can carry a slightly larger size. An unstructured cap such as a soft dad hat moves with the fabric so a large or stiff patch can sit unevenly.
A trucker cap has a thicker foam front panel which makes iron on backing harder to bond evenly across so sew on is usually the safer choice.
A toque presents a different challenge entirely. The knit fabric stretches so a rigid patch can pull the fabric out of shape. A smaller flexible patch with sew on backing generally performs better on a toque than a large stiff patch designed for a structured cap.
Step By Step Guide To Choosing Your Patch
- Measure the front panel on the actual cap you plan to use rather than relying on a generic size guide.
- Check the design against that measurement and simplify small text or fine detail before ordering rather than after a proof shows it is unreadable.
- Choose a size within the panel and leave a small margin around the edge instead of sizing the patch to fill the panel exactly.
- Choose shape and placement together so the shape follows the design outline and sits centred on the front panel.
- Choose backing based on use. Permanent branding suits sew on. A swappable design suits hook and loop. Occasional use suits iron on.
- Review a proof before ordering and check colour against the actual cap fabric rather than a screen since colour can read differently against dark versus light material.
Request a custom patch with guidance
Common Mistakes To Avoid
- Sizing from the artwork file instead of the cap. A design that looks balanced on a screen can be far too small once reduced to a 6 or 7 cm patch.
- Ignoring the curve of the cap. Sharp cornered rectangles are the most common cause of edge lifting on curved panels.
- Choosing iron on for a cap that gets washed often or worn through winter. This is the most common reason a patch comes loose within weeks.
- Cramming too much text into a small patch. If the wording is long either enlarge the patch or simplify the text rather than shrinking the letters.
- Overlooking colour contrast against the cap. A pale design can lose most of its detail on a light coloured cap so always check contrast against the real fabric.
Key Takeaway
Choosing a patch for a cap comes down to four decisions made in order. Size the patch to the actual front panel of the cap. Choose a shape that follows the design and suits the curve of the cap. Choose a backing that matches how the cap will be worn washed and handled through the Canadian climate. Centre the placement on the flattest part of the panel. Get those four decisions right and the rest of the design falls into place.
FAQ Your Cap Patch Questions Answered
Most cap patches work well between 6 and 9 cm wide or about 2.5 to 3.5 inches depending on the panel size and the level of detail in the design.
Sew on for permanent everyday wear. Hook and loop for a patch that needs to be swapped. Iron on only for occasional use on heat safe fabric.
Centred on the front panel between the peak seam and the top of the crown is the standard and most visible placement.
Most designs can be adapted but a smaller flexible patch with sew on backing generally suits the stretch of a knit toque better than a large stiff patch.
Repeated freezing and thawing puts extra strain on adhesive and iron on backings. Sew on stitching holds up better through a full Canadian winter.
Measure the actual panel confirm the design suits the chosen size check colour against the real cap fabric and review a proof before the final order.
A woven patch usually holds small text more clearly than embroidery since it uses finer thread which helps with multi line or small text designs.